Proxmox Installation Guide
An in-depth, step-by-step guide to installing Proxmox VE on a bare metal server, from preparing the bootable media to completing essential post-installation tasks.
Step 1: Download Proxmox ISO
Go to the official Proxmox website to get the latest Proxmox VE ISO image. This is a required file for installation.
https://www.proxmox.com/en/downloads
Step 2: Get Rufus Utility
You'll need a tool to create a bootable USB from the ISO file. Rufus is a popular and reliable choice for Windows. Download it from the official website.
https://rufus.ie/en/
Step 3: Insert USB and Open Rufus
Insert a USB drive (at least 2GB) into your computer. Launch the Rufus utility. It should automatically detect and display your USB drive under 'Device'.

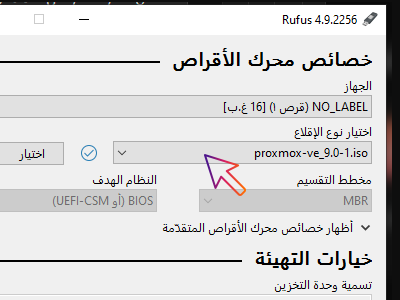
Step 4: Select the ISO File
Under 'Boot selection', click the 'SELECT' button. A file explorer window will open. Navigate to where you saved the Proxmox ISO file and choose it.
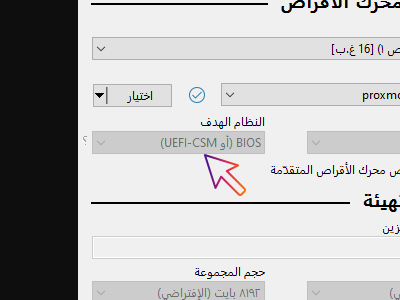
Step 5: Verify Rufus Settings
For a modern server, ensure 'Partition scheme' is set to 'GPT' and 'Target system' is 'UEFI (non CSM)'. The other settings usually don't need to be changed.
Step 6: Confirm Write Mode
Click 'START'. A pop-up will appear asking which write mode to use. It's crucial to select 'Write in DD Image mode' for Proxmox ISOs. Click 'OK' to continue.
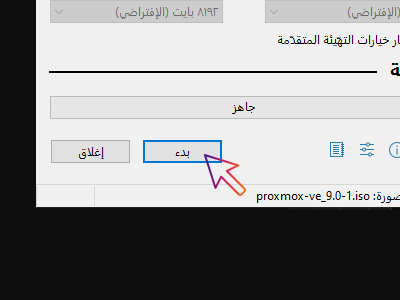
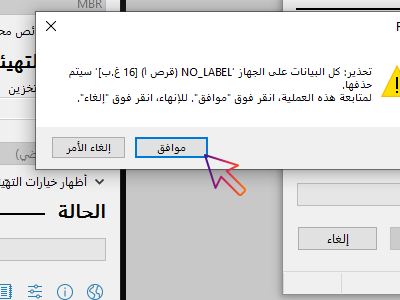
Step 7: Start USB Creation
A final warning will pop up, alerting you that all data on the USB will be destroyed. Click 'OK' to confirm and begin the process of creating the bootable drive.
Step 8: Insert USB into Server
Once the USB creation is complete, unplug it from your computer. Insert the bootable USB drive into your server or target machine for the installation.
Step 9: Reboot and Enter BIOS
Reboot your server. As it starts up, press the key to enter the BIOS or UEFI settings. This key is often F2, F10, F12, or DEL, but it can vary by manufacturer.
Step 10: Change Boot Order
In the BIOS/UEFI settings, find the boot order menu. Change the priority to make your USB drive the first boot option. Save your changes and exit the BIOS.
Step 11: Launch Installer
The server will now boot from the USB. A boot menu will appear with several options. Choose 'Install Proxmox VE (Graphical)' to start the installation wizard.
Step 12: Accept the EULA
The first screen of the installation wizard is the End-User License Agreement (EULA). Read through it and click 'I agree' to proceed with the installation.
Step 13: Select Target Disk
Choose the hard drive where you want to install Proxmox. The installer will show a list of available drives. Be careful, as all data will be erased on the selected disk.
Step 14: Configure Localization
Set your Country, Time Zone, and Keyboard Layout. This is important for ensuring the correct time is displayed on the server and for proper keyboard functionality.
Step 15: Set Root Password
Create a strong password for the 'root' user. This is the main administrator account for Proxmox. Remember this password, as you'll need it for both the console and web interface.
Step 16: Enter Admin Email
Enter an email address for system notifications. Proxmox will send alerts and system information to this email. You can change it later if needed.
Step 17: Configure Network
Set your static IP address, netmask, gateway, and DNS server. A static IP is critical for accessing the web interface and for the server's stability on your network.
Step 18: Review and Install
Review the summary of your configuration. If everything looks correct, click 'Install'. The installation will now begin and copy all necessary files to the hard drive.
Step 19: Finalizing Installation
Wait for the installation to finish. This may take several minutes. Once complete, remove the USB drive from the server and click 'Reboot' to restart the system into the newly installed OS.
Step 20: First Console Login
After the server reboots, you will see a console login screen. Use the username 'root' and the password you set during installation to log in. You can also see your web interface IP here.
Step 21: Access the Web Interface
On a computer on the same network, open a web browser and navigate to the IP address you configured earlier, using port 8006. You may get a certificate warning, which is normal.
https://YOUR-SERVER-IP:8006
Step 22: Log in to the Web Interface
Log in with the username 'root' and the password you created. You should now see the Proxmox dashboard, which is your central hub for managing VMs and containers.
Step 23: Update Your Proxmox VE
Your first task should be to update the system. On the web interface, open the shell for your node (>_ Shell). Run this command to get the latest package information and updates.
apt update && apt full-upgrade -y
Step 24: Add No-Subscription Repository
If you don't have a Proxmox subscription, you need to add the 'No-Subscription' repository to receive updates. In the shell, disable the enterprise repo by renaming it and then add the new sources list.
mv /etc/apt/sources.list.d/pve-enterprise.list /etc/apt/sources.list.d/pve-enterprise.list.bak && echo 'deb http://ftp.debian.org/debian bookworm main contrib' > /etc/apt/sources.list.d/pve-no-subscription.list
Step 25: Remove Subscription Nag Message
Proxmox shows a 'no valid subscription' message on login. To remove it, open the shell and apply a patch by running this command. It's an aesthetic change and doesn't affect functionality.
sed -Ezi.bak 's/ext-ax.get-next-subscription-warning-message-time-not-valid-but-okay/ext-ax.get-next-subscription-warning-message-time-valid-and-okay/g' /usr/share/javascript/proxmox-widget-toolkit/proxmoxlib.js && systemctl restart pveproxy.service
Step 26: Install Recommended Scripts
For advanced post-installation tasks, consider using community-developed scripts. These can help with managing repositories, creating templates for containers, and other useful functions. Run this command to fetch and execute a popular script.
bash -c "$(wget -qLO - https://community-scripts.github.io/ProxmoxVE/scripts/proxmox-ve-post-install.sh)"
